Ryochan's Linux PC-DC Guide Part 2
Now that the PC side of the system is configured, it is time to configure the Dreamcast to connect to the PC.
Starting Notes
This portion of the guide will focus on configuring the Dreamcast to connect to the PC-DC server using Planetweb 2.62. You can use a different version but I would suggest that you use version 2.0 or greater. Also to note, I occasionally use Dream Passport but I can't use it to configure my Internet connection without issues.
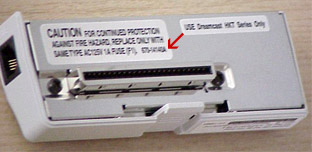
Another really important note is regarding the modem bundled with the Dreamcast. You should probably check the model number of the Dreamcast modem. For North American Dreamcast units, revision 670-14140A does not require the use of a line voltage inducer but revision 670-14140B does require the use of some line voltage inducer or a modem that runs power through the phone line. To check the revision number of the modem, look on the CAUTION sticker located on the silver inner side of the modem. My Dreamcast modem is a 670-14140A.
Planetweb Configuration
Basic Information
Now, time to configure the Dreamcast. Press the pause button to bring up the control panel and go to options (lower right-hand button). Next, go to Internet Connection. From there, here is a list of the options under the Basic Information page and how to configure them.
- Your Real Name: (Anything will work here)
- User Login: dream (Put in the user name that you gave the UNIX user in part 1)
- Password: dreamcast (Put in the password that you gave the UNIX user in part 1)
- Dial Up Number: 555 (Put in at least a one digit number. Leave area code field blank)
- Backup number: (Leave blank)
- DNS1: 0.0.0.0
- DNS2: 0.0.0.0
NOTE: The DNS portion will be taken care of by the ppp daemon on the Linux box so you don't have to specify DNS servers in your Dreamcast configuration; they will be ignored if you do change the default numbers.
Dial Options
Next, click OK to go to the Dial Options page. Here is a list of the options to configure for the Dial Options portion.
- Area code you are dialing from: (Leave blank)
- Long distance call prefix: (Leave blank)
- Call waiting prefix: (Leave blank)
- Outside dialing prefix: (Leave blank)
- Modem Init: AT&F0 (usually the default. Last character is the number zero)
- Dial: Tone
- Dial area code: Off
- Blind Dial: On
The "Blind Dial" option is the most important option on the page. You must have the option turned on. That way, the Dreamcast will not need to detect a dial tone on the line in order to dial out. Just to mention it, there are some games, like Quake 3, that ignore the blind dial option and will try to detect a dial tone on the line. Part 4 will cover how to get around this problem.
Click OK to go on to the Proxy Settings page. There is only one option that you have to check on the Proxy Settings page.
- Use Proxy: No
Click OK to return to the main options menu and then save the configuration to your Dreamcast.
End of Part 2
That is all for part 2; this part was a lot shorter than the last part. In part 3, we will cover launching the mgetty process, connecting the Dreamcast to the Linux server, and getting on the Internet.