EDITING PLAYABLE CHARACTERS
For the first part of this tutorial, we're going to look at how to replace playable character models (Leon, Claire, Sherry etc) with new ones. This is thankfully the easiest mod to attempt in Resident Evil 2 as it merely requires replacing files with new ones. If you're feeling ambitious, you can edit/create your own as well, which I'll go over in the 2nd and 3rd portion of this tutorial.
A playable character's model, animation and textures are stored in .PLD files. To find these, explore & extract your Resident Evil 2 Disc/image, which can be done using either IsoBuster or GD-Rom Explorer. Playable character files are found in the game's PL0>PLD folder (Leon Disc) and PL1>PLD folder (Claire Disc).
You'll find a lot of PLDS here, so here's a detailed list with descriptions for each-
PL00.PLD- Default Leon Outfit
PL00CH.PLD- Default Leon Outfit (Extreme Battle Mode Select Screen)
PL01.PLD- Default Claire Outfit
PL01CH.PLD- Default Claire Outfit (Extreme Battle Mode Select Screen)
PL02.PLD- Default Leon Outfit with sidepack
PL03.PLD- Default Claire Outfit with sidepack
PL04.PLD- Injured Leon
PL05.PLD- Claire w/o Jacket
PL06.PLD- Injured Leon Outfit with sidepack
PL07.PLD- Claire w/o Jacket, with sidepack
PL08.PLD- Leon's Locker Outfit (Left)
PL09.PLD- Claire's Locket Outfit
PL0A.PLD- Leon's Locker Outfit (Right)
PL0B.PLD- Chris Redfield
PL0BCH.PLD- Chris Redfield (Extreme Battle Mode Select Screen)
PL0C.PLD- Hunk
PL0D.PLD- Tofu
PL0E.PLD- Ada Wong
PL0ECH.PLD- Ada (Extreme Battle Mode Select Screen)
PL0F.PLD- Sherry Birkin
For this example, say you want to replace Leon's default outfit (PL00.PLD) with Andrew Coyte/Enrico Marini's 'HD LEON' outfit (download link at the end of this tutorial).
Make a backup of Leon's default and place it elsewhere on your computer just in case, then rename HD LEON's PLD file to PL00.PLD (if it isn't already named as such). At this point, simply drag over HD Leon's file to the PL0>PLD folder, overwriting the pre-existing PL00.PLD (Leon's original default).
And... you're done! Recompile the game using your favorite tool (like Bootdreams, etc), and you'll see that HD Leon now replaces his original outfit!
This simple technique works with 99% of RE2 PLDs. There's a wide variety of fan made RE2 outfits out there, some of which you can find at the following links below-
https://www.tapatalk.com/groups/residen ... eases-f28/
http://re123.bplaced.net/board/viewforum.php?f=38
One thing to note however is that while this technique replaces playable character models, your characters in cutscenes use a different file format from PLDs. We'll refer to those as NPCs (non-playable characters) since you can't interact with them during cutscenes. NPCs (which also include enemies) are in .TIM format and for visual consistency you could replace those too if desired, though that's a bit more complicated. That will be covered in a future tutorial.
PART 2: CUSTOM TEXTURES
If you want to edit or create your own textures, download RE2MV v1.3.2b by Leo2236 (link at the end of this tutorial). This tool allows you to view and edit RE2 models. For this example, we'll use PL00.PLD (Default Leon). Open up RE2MV and drag the PL00 into the program. You'll see the model. In the menu bar, click on TIM and you'll see a pull-down menu with 'Export Texture'. Export the texture as a BMP file to open in Adobe Photoshop (while this tutorial assumes you are using Photoshop, you can likely use whichever image editing program you prefer).
In Photoshop, you'll see the layout of Leon's textures.
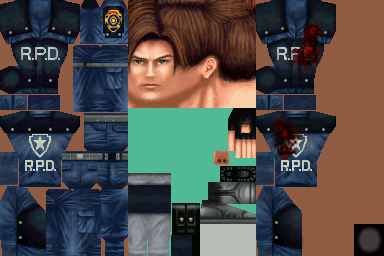
- PLD 4th image.jpg (120.81 KiB) Viewed 25031 times
Edit it however you like then resave as a BMP. If you go back to RE2MV, you'll see the TIM pull down menu also has a 'Replace Texture' option, where you can easily replace the default texture with your edited one and view it on the model directly in the program. This is a great way to see your work before placing it back into the game. Before you do that however, open up Paint and resave that newly created BMP you did in Photoshop as a BMP once more. For some reason, RE2MV doesn't open up Photoshop saved BMPs, so resaving in Paint is necessary. Once you do that it'll then open in RE2MV.
PART 3: CUSTOM MODELS
If you want to be even more ambitious, you can also use RE2MV to export the 3d model parts into Blender and edit them to create your own unique models! To do this, click on MD1 in RE2MV's menu and select 'Export Part'-
Once you do, you'll see that Leon's body is composed of objects (see above), RE2MV will highlight which part you'll export depending on which object you select. Export an object as a .OBJ file, which you can open in Blender. Here I've exported Object08 (Leon's Head) and here is how it looks in Blender-
Go to Object Mode's pull down menu and select Edit Mode. Now you can edit various points on Leon's head to shape it anyway you like. Once you're done, export your work as a .OBJ, head back to RE2MV and go to MD1>Replace Part and select the newly edited part to see how it looks on the model.
By using Blender, RE2MV and Photoshop you could make something like this for instance- a zombie child I created using Sherry's model as the base (which you encounter in Resident Evil 2: Special Edition-
https://dreamcast-talk.com/forum/viewto ... 53&t=15427)
So with the PLDs, you can edit or create new textures as well as edit the 3d model objects. Whichever way you do it, when you're done with your piece and it looks good to you in RE2MV, save it and drop it in the PL0>PLD (or PL1>PLD) folder, recompile the game and test out the new edits in-game!
Here are links to acquire HD Leon, RE2MV, GD-Rom Explorer and a portable version of Blender. While HD Leon is freely available for use, the creator requests it not be modified without his permission (as stated in his HDLeon.txt)-
1)
https://portableapps.com/apps/graphics_ ... r_portable (Blender Portable)
2)
https://www.romhacking.net/utilities/1459/ (GD-ROM Explorer)